
Pi-Hole with pfSense
I have been using pfSense as my home router for a few years. A few months ago, I decided to setup PiHole on a Raspberry Pi to block ads across all devices on my network. This post outlines how I accomplished this.
Note: This post does not cover the initial setup of a pfSense router.
Goals
This is what I was hoping to have by the end of the project:
-
All devices on the network use the Pi-Hole for DNS. This should happen automatically, with no manual configuration of DNS settings on each device. Any new device added to the network should automatically have ads blocked.
-
The Pi-Hole should forward DNS requests to my pfSense router, which then forwards requests to the public DNS server. (In my case, OpenDNS)
(The reason for this is that I like having the ability to create DNS entries and aliases for machines within my network if needed. Managing this in pfSense is easy.)
DHCP Static Mapping
In order for Pi-Hole to function properly, it needs to have a consistent IP address. You could set this statically on the device itself, but I prefer to do a DHCP Static Mapping (or DHCP Reservation).
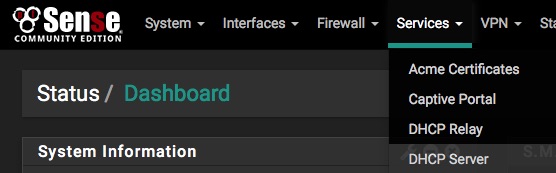
Login to your pfSense router, click on Services, then DHCP Server.
Scroll down to the bottom, then click on Add to create a new Static Mapping. Enter the MAC Address of your Raspberry Pi, the IP address you would like to use, and the hostname you would like to use.
Because my pfSense router is 192.168.1.1, I chose to make my Pi 192.168.1.2. I used the hostname ‘pihole’ because I am not very creative.
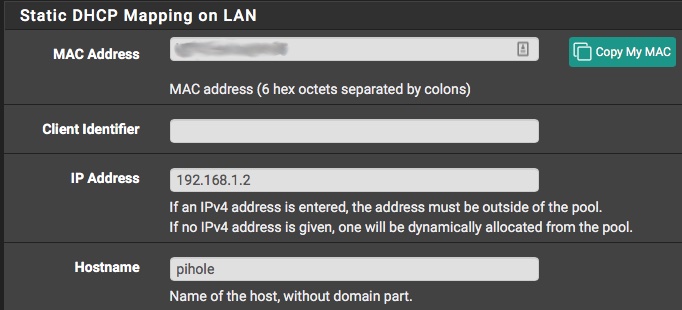
I was able to leave all of the other settings blank, but your environment may be different.
Setting up the Pi
This was fairly straight forward, and I won’t spend too much time going over the information that is already documented elsewhere.
I downloaded the latest version of Raspbian and cloned it onto an SD card. I then connected the Pi to a monitor, keyboard, mouse, and ethernet, and booted it up.
With the Pi booted up, I ran apt to update all software, enabled SSH access, changed the default login information, set the hostname, and configured the Pi to boot into CLI instead of the GUI.
With that done, I shut the Pi down, moved it to it’s new home in the basement, connected power and ethernet, and booted it backup.
Installing Pi-Hole
Since SSH is enabled, you can now SSH into your Pi from another workstation using ‘ssh $USER@hostname.domain’ or ‘ssh $USER@IP address’.
I logged in and started the Pi-Hole installer. (I recommend doing the semi-automated install rather than piping to bash.)
The wizard is fairly straight forward. The one important step is the the upstream DNS setting. You could have this forward directly to a public DNS server. I wanted DNS queries to still go through my pfSense machine, so I entered the IP address of my pfSense machine here instead.
Logging into the Pi-Hole Admin Page
Now that Pi-Hole has been configured, you should be able to login to the admin panel using http://ipaddress/admin, or if you created a static mapping and hostname, http://hostname.domain/admin.
See the Pi-Hole documentation for information about this page. I did not need to make any changes to configuration here.
Making the switch!
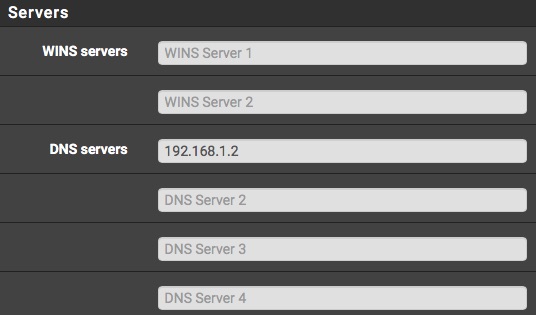
At this point, you will have a working Pi-Hole, but no devices on your network are using it for DNS. You could go around to every machine on your network and manually enter your Pi-Hole’s IP address for DNS, but that is not ideal. A much better way is to have pfSense hand out 192.168.1.2 as the DNS server for all DHCP devices on the network.
To do this, simply go to Services, then DHCP Server in the pfSense webpage. Scroll down a little bit to the server section and you will see a DNS Servers field. Enter your Pi-Hole’s IP address here, then scroll down and click save.
Note: Depending on your DHCP lease time, it may take some time for all of the devices on the network to get the new address. You can manually renew the DHCP lease or reboot devices to speed this process up if you would like.
Making exceptions for devices
After using Pi-Hole for a while, I did notice a few issues with the YouTube application on our AppleTVs. There were a few cases where Pi-Hole would block an ad, which would then cause the entire video to not load. To solve this, I decided to just have the AppleTVs not use Pi-Hole for DNS at all, but rather go straight to OpenDNS.
Rather than manually set the DNS server addresses on both of our AppleTVs manually, I decided to let pfSense do it for me.
In pfSense, go to Status, then DHCP Leases to see a list of all active DHCP leases on your network. Find the device you would like to exempt from Pi-Hole (in my case an AppleTV named Bedroom), and click the green + button on the right side to create a new Static Mapping. (NOTE: You could also create a static mapping the same way we did for the Pi, but since the device is already on the network, pfSense will already have the MAC address filled out for us.)
In this section, make sure the MAC address is already filled out. In the DNS section, enter your public DNS servers of choice. You can also set a static IP address and hostname if you’d like, but that is optional. Scroll down and click on Save.

Once this is done, reboot your AppleTV, then go into Settings and verify that the new DNS servers appear.
You can then repeat these steps for any other devices you’d like to be exempt from Pi-Hole.